0 0
Microwave Caramels

Share it on your social network:

Or you can just copy and share this url

Ingredients

Adjust Servings:
1/4 cup butter
1/2 cup white sugar
1/2 cup brown sugar
1/2 cup light karo syrup
1/2 cup sweetened condensed milk

Nutritional information

182.1
Calories
44 g
Calories From Fat
5 g
Total Fat
3.1 g
Saturated Fat
14.5 mg
Cholesterol
61.4 mg
Sodium
35.2 g
Carbs
0 g
Dietary Fiber
27.9 g
Sugars
1.1 g
Protein
49 g
Serving Size

Bookmark this recipe

You need to login or register to bookmark/favorite this content.

Microwave Caramels

Features:
    Cuisine:

    You can totally make these in the microwave. Don't be afraid of this...these are much easier and just as tasty as the long-form caramel making method on the stove. Notes: !!- You WILL need a LARGE heavy duty dish like Pyrex or Glass. It needs to be quite large as the mixture boils up a lot...especially the last 2 minutes. - Depending on the consistency you want, take it out at the 5:30 min mark for a very soft ball texture, and at the 6:00 min mark for a true soft ball texture. (see below for different microwave wattages) - When you take it out, pour it into an 8x8 or a 9x9 pyrex dish. - Microwave power is important as well. In the notes above, used a 1400w microwave. When using a 1100w microwave, I have made these just fine stirring at 2 minute intervals and putting it in for an extra 60-90 seconds at the end. !!- It's important to watch the color when using the microwave. If it's a really light color then it should be done a little more. When it starts to noticeably change into a slightly darker color, you can pull it out knowing that it will be in the very soft-soft ball state. You don't want it to get dark as that's the hard ball state and that's not good. Yuck!! Haha.

    • 26 min
    • Serves 12
    • Easy

    Ingredients

    Directions

    Share

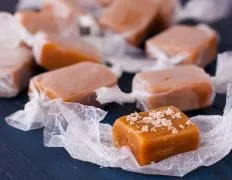
    Microwave Caramels,Great gift idea that I saw this on T.V. and put here for safe keeping.,You can totally make these in the microwave. Don’t be afraid of this…these are much easier and just as tasty as the long-form caramel making method on the stove. Notes: !!- You WILL need a LARGE heavy duty dish like Pyrex or Glass. It needs to be quite large as the mixture boils up a lot…especially the last 2 minutes. – Depending on the consistency you want, take it out at the 5:30 min mark for a very soft ball texture, and at the 6:00 min mark for a true soft ball texture. (see below for different microwave wattages) – When you take it out, pour it into an 8×8 or a 9×9 pyrex dish. – Microwave power is important as well. In the notes above, used a 1400w microwave. When using a 1100w microwave, I have made these just fine stirring at 2 minute intervals and putting it in for an extra 60-90 seconds at the end. !!- It’s important to watch the color when using the microwave. If it’s a really light color then it should be done a little more. When it starts to noticeably change into a slightly darker color, you can pull it out knowing that it will be in the very soft-soft ball state. You don’t want it to get dark as that’s the hard ball state and that’s not good. Yuck!! Haha.,This is a very poorly written recipe! Great for the person who wrote it as they assume everyone else trying to make it has experience in making caramels. No reference to use a microwave safe bowl that can also tolerate extreme temperatures (sugar and fat get very hot). Plastic will melt so you must use Pyrex, but then what size? Does it rise up or boil over? Also microwave ovens vary in strength, there is no mention on cooking times for different strength microwaves. Would help if they mentioned what temperature the caramel needs to reach but then it can be tricky using a candy thermometer with microwave cooking. Maybe these are best made in a saucepan on a stove top with a candy thermometer?


    Discover ground-breaking new supplements!    SHOP & SAVE


    Steps

    1
    Done

    Combine All Ingredients.

    2
    Done

    Cook 6 Minutes, Stirring Every Two Minutes.

    3
    Done

    Stir and Pour Into Lightly Greased Dish.

    4
    Done

    Let Cool.

    5
    Done

    Cut, Wrap in Wax Paper & Store in Air Tight Container.

    Sean Murphy

    Comfort food queen known for her hearty and soul-warming dishes that evoke nostalgia.

    Recipe Reviews

    There are no reviews for this recipe yet, use a form below to write your review
    Creamy Green Pepper Soup
    previous
    Creamy Green Pepper Soup
    Featured Image
    next
    African Sweet Potato Soup With Peanut Butter
    Creamy Green Pepper Soup
    previous
    Creamy Green Pepper Soup
    Featured Image
    next
    African Sweet Potato Soup With Peanut Butter

    Add Your Comment