
Ingredients
-
6 1/4
-
5
-
1
-
-
-
-
-
-
-
-
-
-
-
-
Directions

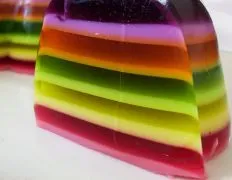
Rainbow Ribbon Mold,This is a show stopping dessert that will receive oohhs and aahhs at any gathering! This looks great made in a bundt pan or jello mold but also works in a 9×13 pan. Use your favourite flavours!,If you make this in a 9×13 pan, the layers are extremely thin and there is not much wiggle room for the pan being slightly off balance. I had a really difficult time trying to get the pan level in the fridge since even the tiniest difference translated to the layer being thick on one end and a thin film on the other. If you don’t have a bunt pan, use something smaller than a 9x 13. One person’s genius suggestion to mix all the jello up first, at one time, was on target. However, be aware that by the time you are pouring the 4 and 5 colors, the jello may thicken at room temp. used a double boiler to gently heat the last couple of colors after I had already made a sad attempt to spread partially congealed jello over tremendously thin under layers of jello. Don’t make that mistake. Just reheat the jello to thin it again. Also, if using a 9×13, the first couple of layers do take 15-20 minutes in between but then all the other layers set SUPER fast…like 5 minutes. I think it will take me another attempt to get it perfect. The size of the pan and super thin layers made this more difficult, also the jello that thickened too soon threw me off. I panicked. Other than that, it looks absolutely stunning despite those problems. I’ll be cutting into it tomorrow and hope that my rainbow of flavors tastes good. Fingers crossed.
Discover ground-breaking new supplements! SHOP & SAVE
Steps
|
1
Done
|
This Is a Real Make Ahead Dessert! Plan on It Taking About 3 Hours to Make, the Day Before You Need It. It Only Takes a Few Minutes Every 20 Minutes or So, but You Can't Let a Layer Set For Hours Before Adding the Next One, or You Risk the Layers Sliding Apart After Unmolding. and, You Want the Finished Mold to Set Up at Least Over Night. |
|
2
Done
|
Lightly Spray a Bundt Pan or 9x13 Pan With Non Stick Spray. |
|
3
Done
|
Wisk 1 Package of Jello Into 1-1/4 Cups Boiling Water in a Small Bowl at Least 2 Minutes Until Completely Dissolved. |
|
4
Done
|
Pour 3/4 Cup of the Dissolved Gelatin Into 8-Cup Ring Mold Sprayed With Cooking Spray. Refrigerate About 15 Minutes or Until Set but not Firm. (it Should Stick to Finger When Touched). by Placing It Onto a Level Surface in Your Freezer You Can Speed Up the Process. |
|
5
Done
|
Refrigerate Remaining Jello in Bowl About 5 Minutes or Until Slightly Thickened (consistency of Unbeaten Egg Whites). Gradually Stir in 3 Tablespoons of the Coconut Milk and Stir Until Well Blended. |
|
6
Done
|
Spoon Over Jello in Pan. |
|
7
Done
|
Refrigerate About 15 Minutes or Until Gelatin Is Set but not Firm (again, Jello Should Stick to Finger When Touched and by Placing It Onto a Level Surface in Your Freezer You Can Speed Up the Process.) |
|
8
Done
|
Repeat Process With Each Remaining Jello Flavor. |
|
9
Done
|
***it Is Very Important to Cool Dissolved Gelatin to Room Temperature Before Pouring Into Mold or the Layers Will not Be Well Defined-but It Will Still Taste Good :)***. |
|
10
Done
|
Repeat Steps Again For a Total of 10 Alternating Clear and Creamy Gelatin Layers. |


