Ingredients
-
-
2
-
-
1
-
1
-
1
-
-
1
-
-
1
-
-
-
-
-
Directions
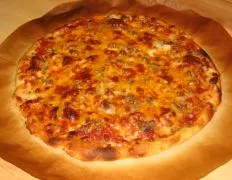
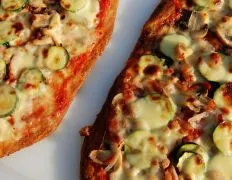
Amazing Thin Crust Pizza,I finally mastered pizza making at home! It was a day to celebrate, since this pizza is actually better than you often go out for. When I make this my husband says it’s always the best part of his day. It’s a combination of recipes and techniques that I put together from Cook’s Illustrated, a very good cook I know, and some “serious” pizza guys. This recipe makes a 13×18 inch half-sheet size medium crust pizza, OR two traditional round thin crust pizzas, and the crust is crispy/tender. (I find I can get a thinner crust from a round pizza, since there’s a little more room to spread the dough out.) The sauce is very flavorful and I’ve tried to include all my tips for success! You MUST have a pizza stone for this, and pulling the pizza on the parchment onto an upside-down half sheet pan makes it easy to transfer the pizza to the stone. The sauce recipe will make enough for 3 medium pizzas, OR 6 thin crust pizzas, so reserve the extra for another pie. Layers for the topping need to be thin enough to allow the crust to crisp. (I know it goes against all instinct, but it’s very important to please practice restraint!) I’ve revised the recipe to include a little less of the toppings for better success. Preparation time includes rising time for the dough and may seem like a little work, but once you’ve tried this you may never go out for pizza again!,Can you refrigerate this and bake the next day?,I have been making this thin crust for the last couple of years. It is awesome and the best recipe I have found so far! If you have not tried it, do so. You won’t be disappointed.
Discover ground-breaking new supplements! SHOP & SAVE
Steps
|
1
Done
|
Dough: in the Work Bowl of a Food Processor Fitted With the Plastic Dough Blade, Pulse the Flour, Yeast, and Salt to Combine; About Five 1-Second Pulses. With the Machine Running, Slowly Add the Oil, Then the Water Through the Feed Tube; Continue to Process Until the Dough Forms a Ball, About 15 Seconds. Generously Dust the Work Surface With Flour. Using Floured Hands, Transfer the Dough to the Work Surface and Knead Lightly, Shaping the Dough Into a Ball. Lightly Oil a 1-Quart Measuring Cup With Cooking Spray, Place the Dough in the Measuring Cup and Cover Tightly With Plastic Wrap. Set Aside in a Draft Free Place Until Doubled in Volume, 1 to 1 - 1/2 Hours. |
|
2
Done
|
Pizza Sauce: Mix This Up While the Dough Is Rising, Giving the Flavors Some Time to Meld. |
|
3
Done
|
Preheat the Oven to 550 Degrees F. This May Take as Long as 30 Minutes, So Allow Enough Time For the Oven to Get Hot. Remove All Racks Except the One Holding Your Baking Stone, For Easier Positioning of Pizza Onto the Stone. |
|
4
Done
|
Building: When the Dough Has Doubled, Grease Hands With Olive Oil and Remove It from the Measuring Cup, Placing Into the Middle of a Lightly Floured Board. (a Silpat Placed on the Work Surface Makes Cleaning Up Easier.) Being Careful not to Deflate All the Air in the Dough, Roll Dough Into a Ball and Set Aside. Cover With Plastic Wrap and Let Rest For 10 Minutes. Meanwhile, Cut Parchment Paper and Set Aside. Do not Cut Parchment Larger Than Your Pizza Stone, to Mimimize Risk of the Paper Catching Fire. |
|
5
Done
|
Oiling Hands Again, Gently Stretch the Dough, Shaping It Into a Large Rectangle on the Parchment Paper. With Palms, Stretch and Flatten the Dough Until It Takes the Shape You Want It to Have, Keeping a Slightly Thicker Edge For the Crust. Dock the Surface of the Dough With Your Fingers to "texture" the Surface and Hold the Toppings. Oil the Dough Before Building the Pizza. |
|
6
Done
|
Place Finely Cut (or Dried) Basil Across the Top of the Dough. Add Mozzarella and Provolone Cheese Slices on Top of the Basil. Spread a Thin, Even Layer of the Pizza Sauce, Adding Pork Sausage, Shredded Mozzarella and Mild Cheddar Over the Top of the Dough. (you Can Really Use Any Toppings You'd Like.). |
|
7
Done
|
Baking: Position the Baking Stone on the Bottom Rack of Your Electric Oven, or on the Floor of Your Gas Oven. Lift the Parchment Paper and Slide Onto the Bottom of a Sheet Pan, Then Quickly Slide Pizza Onto the Baking Stone. Shut the Oven Door, and Reset Your Oven For 500 Degrees. Bake For 10-12 Minutes, Until the Edges of the Crust Are Browned. Check the Bottom of the Pizza For Doneness Before Removing from the Oven. Using Tongs, Transfer Pie Onto Oven Rack and Set Aside to Cool a Few Minutes. Cut With a Pizza Cutter and Enjoy! |

